Altering the Styling of a Page Element
1. Find the element that you'd like to change. Example: an H2 tag ("Quick Links")
2. Use your browsers developer tool panel to inspect the element and find the correct selector

3. Create an Embed Media Widget and add appropriate code in the Web Tab

4. Add Embed Media Widget to Layout of the page
5. Save Layout
Add Custom CSS Class to Widget Container
Custom CSS classes can be created and applied to the markup of a widget’s outer container. The class names can then be used as selectors in a custom theme. This feature is available in the following widgets:
- List of Posts
- List of Files
- Featured Post
- Tabs
- Accordion
- Embed Media
- Columns
- Custom Text/HTML
- Taxonomy
- Random
1. In order to enable the feature, a sites administrator needs to go to the Manage Members screen and apply the feature to a specific role or roles. Creating a custom role (ex.custom themer) and enabling the feature for that role only is recommended. This will limit its availability to people with custom theming abilities.

2. The custom class name field appears at the bottom of a widget form.

3. Custom class name(s) in the markup
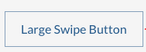
Creating a "Swipe Button"
A visual feature included in OpenScholar themes is a “swipe button”—mousing over the button generates a slow, left to right color swipe effect.
To create a small or large button:
- Create a text link (learn about adding links)
-
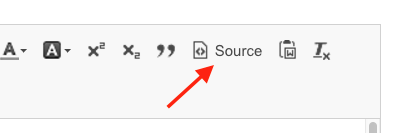
In the wysiwyg/text editor, view the HTML view by selecting the "Source"
- Copy/paste one of the following:
- class="os-swipe-large”
- class="os-swipe-small”
Displays:
![]()
Updated: 18Sep18