Page content

Page Settings

Publishing Options

Take a short few minutes to watch this video for the quickest way to edit post settings on OpenScholar.

For more information, you can read the written documentation below.

...
Read more about Page Settings

Building Responsive Data Tables

Responsive web design allows a site to be presented with an optimal viewing experience across a variety of screen sizes, such as mobile phones and tablets. The instructions below will ensure that any tables you build in OPenScholar will behave responsively.

To Create a Responsive Table

  1. Go to the edit area of the page where you want to insert a table
  2. Place the cursor in the body of the text area where you want to insert a table and click on the Table icon...
Read more about Building Responsive Data Tables

Moving Pages

You have the option of adding existing pages to a section or to move pages around within the section outline. 

To Add Existing Pages to a Section

  1. Click Add New
  2. Select Existing Page to a Section
    add existing page

     
  3. ...
Read more about Moving Pages

Adding a Page to the Menu

On the Edit Page form (see example below), you have multiple options available to you including the ability to add the page post to a menu.

Read more about Menus

By selecting the Menu Settings link (you can view this when you edit the page), you can toggle the Provide a menu link box and you'll be able to give the Menu link a title and select which menu you want the page to live in.

...

Read more about Adding a Page to the Menu

Importing Pages

Locating the Import Template

  1. Navigate to the control panel
  2. Click on Site Content
  3. Click on Import
  4. Choose the type of content you want to Import from the enabled App list. Learn how to Enable an App

Content that can be imported will have a link to a downloadable excel spreadsheet template. (see image below)

... Read more about Importing Pages

Overview of the Text Editor (WYSIWYG)

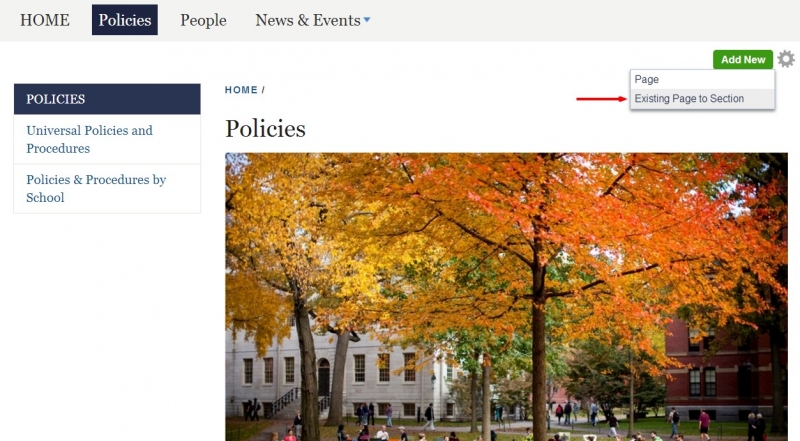
Your site comes with a rich-text editor which functions as any standard word processor might. The term "WYSIWYG" stands for "What you see is what you get" meaning that changes you make in the text editor area will appear as they would on the page itself.

There are options for bold, italic, bulleted and numbered lists and more. Most of these you'll recognize from word processors. These are used in the same way you'd expect. Select the text you want to change, click the button and it will be bold, underlined, or change font color for you....

Read more about Overview of the Text Editor (WYSIWYG)

Adding Inline Images

This document will explain how to place inline images in the body of your page content.

1.  To add an inline image, enter the editor of the page you want to modify.
2.  Click on the "Media Browser" icon  at the top of the text editor box.

...

Read more about Adding Inline Images

Adding Links (Hyperlinks)

A hyperlink is a word, or a group of words, that will allow your use to click on them and jump to another page or document.  This document will explain how you can add links to your content using the link tool within the text editor.

1. Find the content you want to modify, and enter its editor.  
2. Find the text you want to link in the Body section, and highlight the text.
3.  In the top of the text editor, click on the "Link" icon(...

Read more about Adding Links (Hyperlinks)

Adding Inline Files

Follow the steps below to add an inline file within your page content.

1.  Enter the text editor for the page you want to modify.
2.  Highlight the text that you want to use for your link.
3.  Click the "Link" button (...

Read more about Adding Inline Files

Pages